0x00 写在前面
布局 XML 转 Bitmap 是我最近遇到的一个需求。其实按理来说并不难解决,但是网上很多文章用的都是已经被官方废弃了的方法,或者说只有代码没有介绍,甚至连注释都没有。因此特地写篇文章记录一下我是如何实现这个功能的。
0x01 创建一个待转换的布局 XML
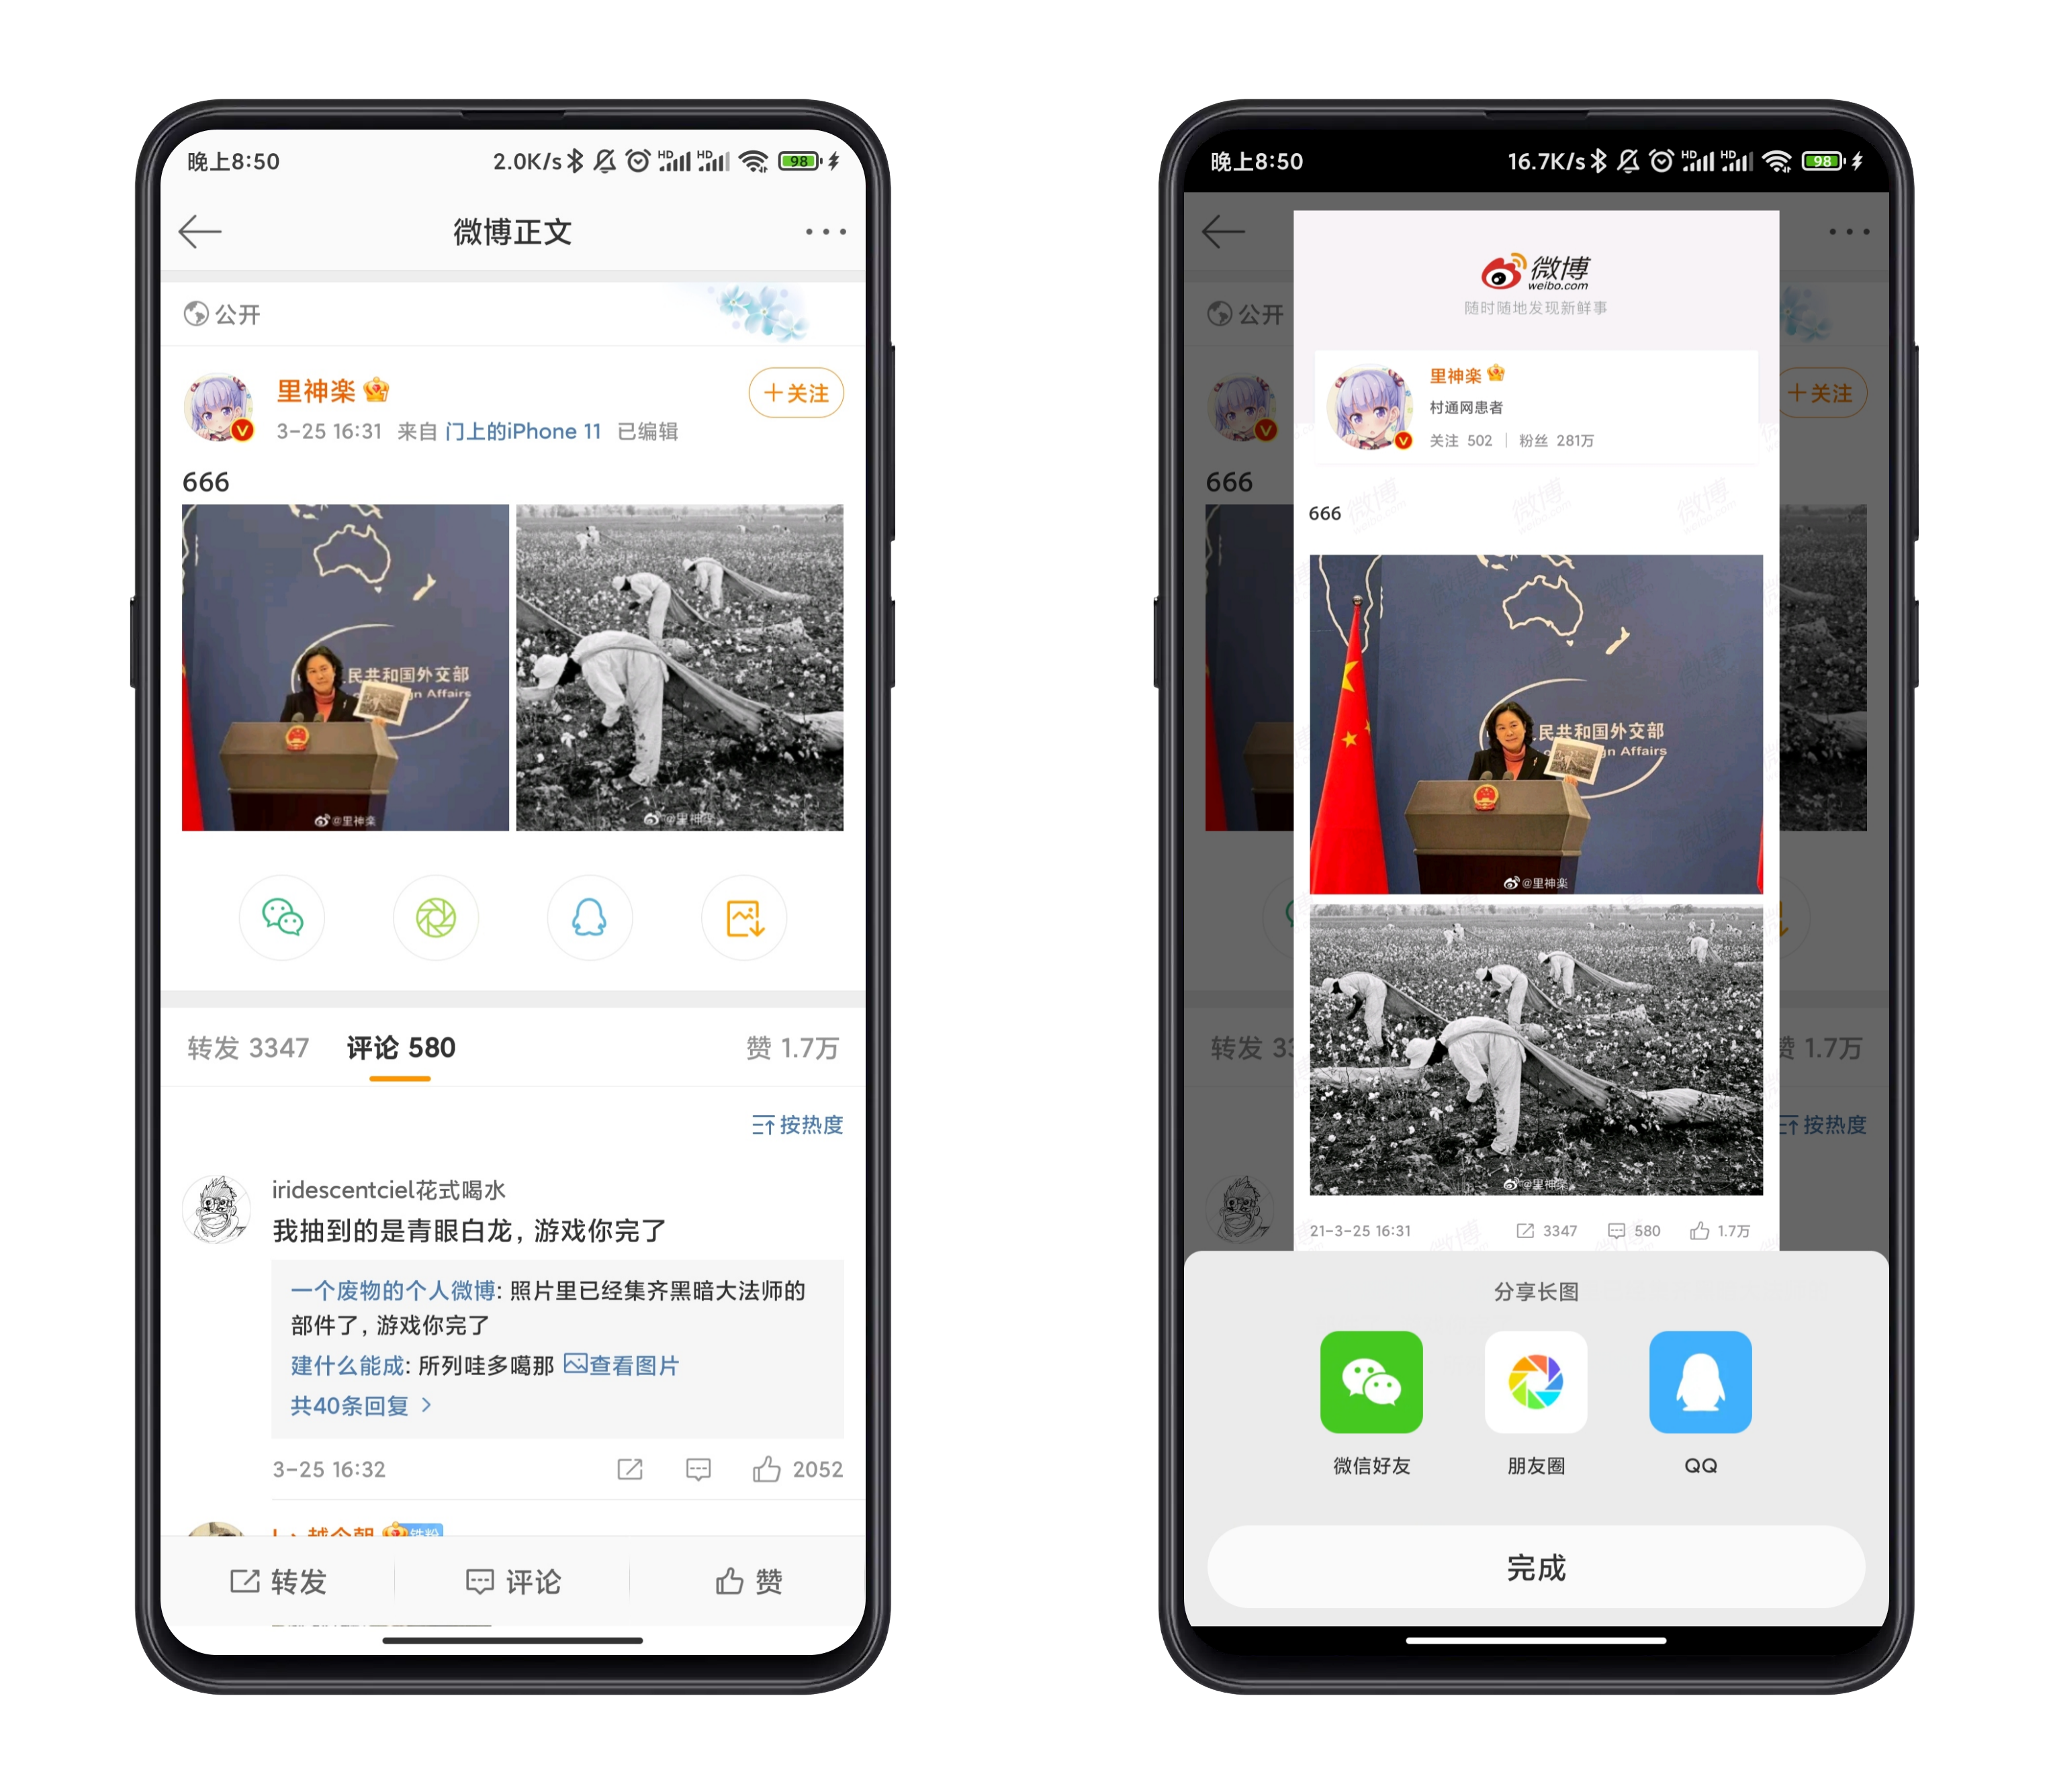
既然是「布局 XML 转 Bitmap」,那自然首先要创建一个待转换的布局 XML。很多情况下,这个布局 XML 都并不是已经显示在手机界面中的。比如说微博的生成长图功能,真实的微博正文布局和长图内容并不相同,所以要创建一个单独的布局,然后让这个布局转成 Bitmap。
假设我有这样一个布局:
<androidx.constraintlayout.widget.ConstraintLayout
    xmlns:android="http://schemas.android.com/apk/res/android"
    xmlns:app="http://schemas.android.com/apk/res-auto"
    xmlns:tools="http://schemas.android.com/tools"
    android:id="@+id/bitmap_root"
    android:layout_width="match_parent"
    android:layout_height="wrap_content"
    android:paddingBottom="32dp">

    <TextView
        android:id="@+id/content"
        android:layout_width="0dp"
        android:layout_height="wrap_content"
        android:layout_marginStart="16dp"
        android:layout_marginTop="32dp"
        android:layout_marginEnd="16dp"
        android:textAppearance="@style/TextAppearance.AppCompat.Body2"
        app:layout_constraintEnd_toEndOf="parent"
        app:layout_constraintStart_toStartOf="parent"
        app:layout_constraintTop_toTopOf="parent"
        tools:text="这里是一段正文内容,用来显示正文信息。" />

    <TextView
        android:id="@+id/password"
        android:layout_width="match_parent"
        android:layout_height="wrap_content"
        android:layout_marginStart="16dp"
        android:layout_marginTop="16dp"
        android:layout_marginEnd="16dp"
        android:fontFamily="serif-monospace"
        android:textColor="#212121"
        android:textSize="20sp"
        android:textStyle="bold"
        android:gravity="center"
        app:layout_constraintEnd_toEndOf="parent"
        app:layout_constraintStart_toStartOf="parent"
        app:layout_constraintTop_toBottomOf="@+id/content"
        tools:text="A1B2-C3D4-E5F6-G7H8" />

    <ImageView
        android:id="@+id/qr_code_img"
        android:layout_width="100dp"
        android:layout_height="100dp"
        android:layout_marginTop="32dp"
        app:layout_constraintStart_toStartOf="parent"
        app:layout_constraintEnd_toEndOf="parent"
        app:layout_constraintTop_toBottomOf="@id/password"
        tools:src="#5F5F5F"/>

</androidx.constraintlayout.widget.ConstraintLayout>
这段代码显示的效果是这样的:
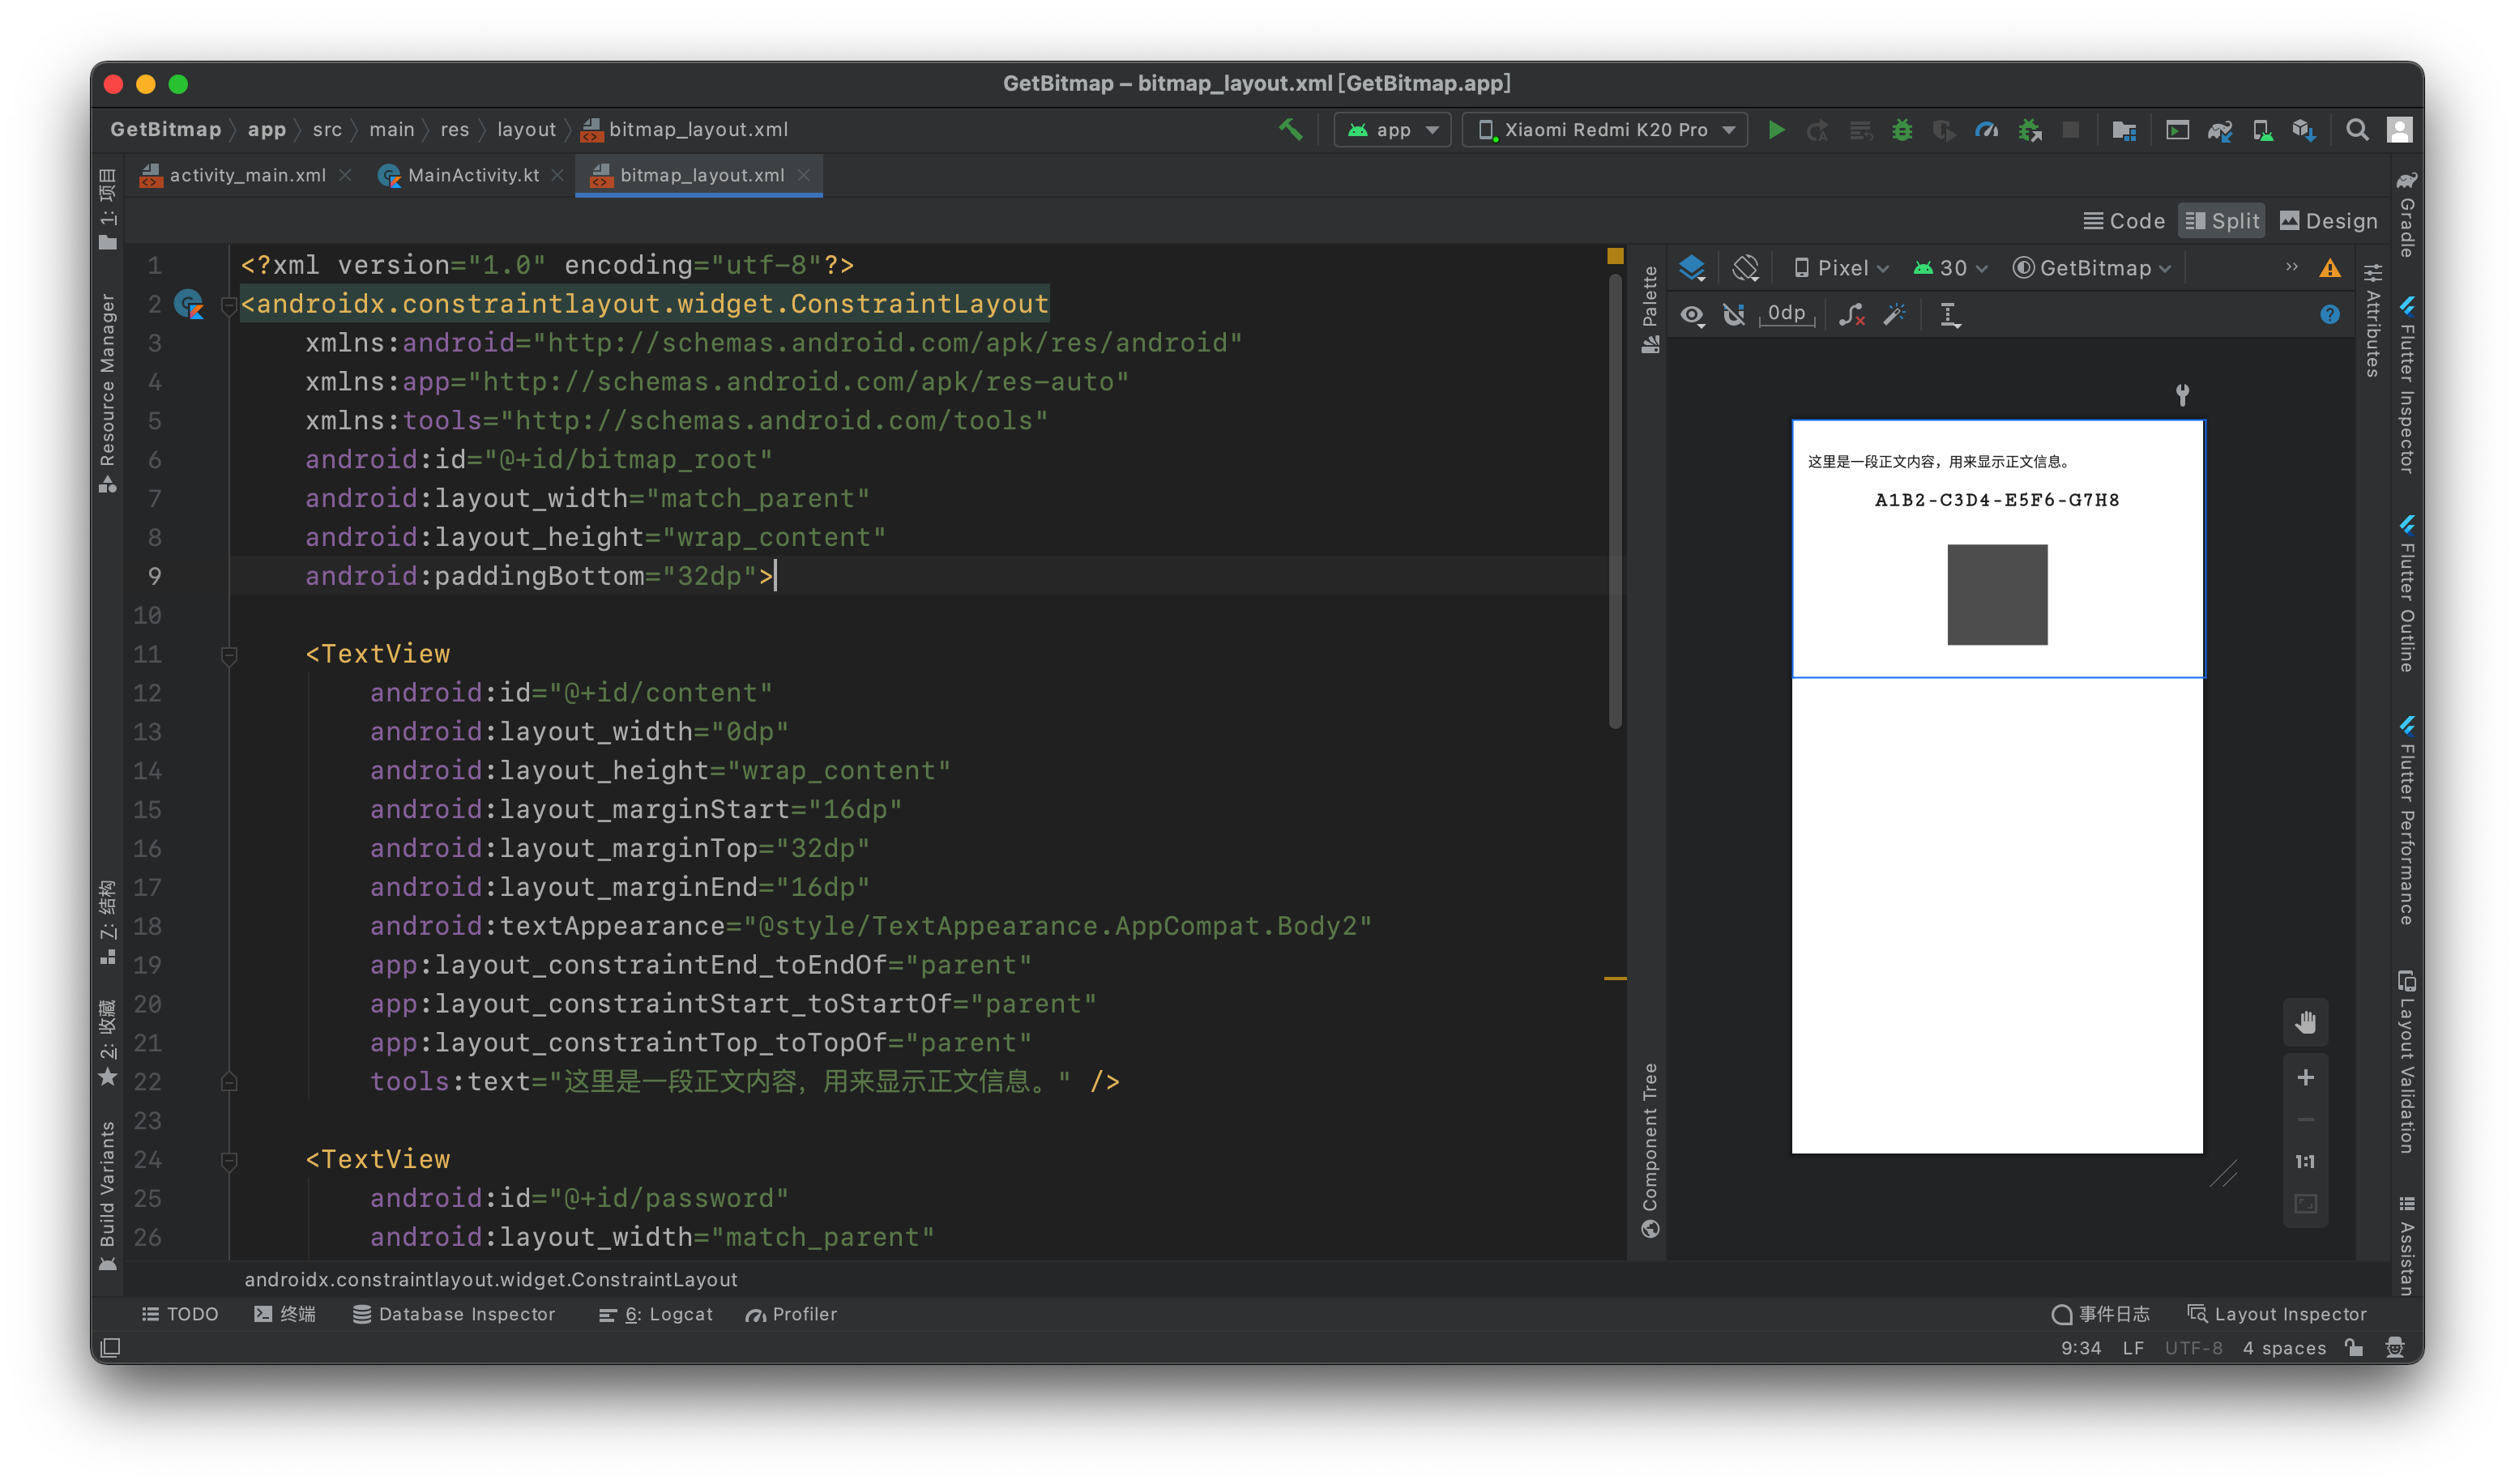
这个布局其实没什么需要特别注意的,就是记得设置一下根布局的 ID,之后还要用到。
0x02 创建用来展示 Bitmap 的界面
接下来就是创建用于展示 Bitmap 的界面。这个界面可以是一个 Activity,也可以是其他的组件。这里我用的是一个 Activity,反正是一个 Demo,那自然是怎么简单就怎么来了。
<androidx.coordinatorlayout.widget.CoordinatorLayout xmlns:android="http://schemas.android.com/apk/res/android"
    xmlns:tools="http://schemas.android.com/tools"
    android:layout_width="match_parent"
    android:layout_height="match_parent"
    tools:context=".MainActivity">

    <ScrollView
        android:layout_width="match_parent"
        android:layout_height="match_parent">

        <LinearLayout
            android:layout_width="match_parent"
            android:layout_height="match_parent"
            android:orientation="vertical">

            <TextView
                android:id="@+id/title"
                android:layout_width="match_parent"
                android:layout_height="wrap_content"
                android:text="生成密码的预览:"
                android:textSize="18sp"
                android:textColor="#212121"
                android:layout_marginStart="16dp"
                android:layout_marginEnd="16dp"
                android:layout_marginTop="16dp"/>

            <ImageView
                android:id="@+id/preview"
                android:layout_width="match_parent"
                android:layout_height="wrap_content"
                android:layout_marginStart="16dp"
                android:layout_marginEnd="16dp"
                android:layout_marginTop="16dp"/>

        </LinearLayout>

    </ScrollView>

</androidx.coordinatorlayout.widget.CoordinatorLayout>
其中 ImageView 是用来展示 Bitmap 的。
0x03 加载布局并生成 Bitmap
直接看代码:
class MainActivity : AppCompatActivity() {
    @SuppressLint("SetTextI18n")
    override fun onCreate(savedInstanceState: Bundle?) {
        super.onCreate(savedInstanceState)
        setContentView(R.layout.activity_main)

        // 先用 LayoutInflater 加载一下布局,但是将 root 设置为 null
        // 这样就只是「虚晃一枪」,实际上布局没有显示在界面中,但却获取到了 view 对象
        val view = LayoutInflater.from(this).inflate(R.layout.bitmap_layout, null)
        // 根据获取到的 view 对象,查找待转换布局中的各个组件,包括正文内容、密码内容、二维码图片以及根布局
        val contentTextView = view.findViewById<TextView>(R.id.content)
        val passwordTextView = view.findViewById<TextView>(R.id.password)
        val qrCodeImageView = view.findViewById<ImageView>(R.id.qr_code_img)
        val bitmapRootLayout = view.findViewById<ConstraintLayout>(R.id.bitmap_root)

        // 设置正文内容
        contentTextView.text = """
            该图片是由 XXX 生成的云同步密钥备份图片,请您妥善保存该图片。

            请不要:
            * 通过任何社交媒体平台发送该图片
            * 将该图片一直保存在手机相册中
            * 上传该图片至一些不可靠的云存储服务

            最佳的做法是将该图片文件备份至您的电脑或 U 盘,或者其他足够安全、不会被其他人访问到的存储介质中。如果您愿意,将该图片打印出来然后保存也是个不错的选择。
            """.trimIndent()
        // 设置密码文本内容
        passwordTextView.text = "A1B2C-3D4E-5F6G-7H8I9"
        // 设置二维码图片
        qrCodeImageView.setImageResource(R.drawable.qrcode_password_test)

        // previewImageView 是用于预览 Bitmap 的 ImageView
        val previewImageView = findViewById<ImageView>(R.id.preview)

        // bitmapRootLayout 是待转换的 Layout 的根布局
        // 这里设置的 measure 参数的效果是图片宽度和屏幕宽度相同,纵向则自动调整
        bitmapRootLayout.measure(View.MeasureSpec.makeMeasureSpec(resources.displayMetrics.widthPixels, View.MeasureSpec.EXACTLY),
            View.MeasureSpec.makeMeasureSpec(0, View.MeasureSpec.UNSPECIFIED))
        bitmapRootLayout.layout(0, 0, bitmapRootLayout.measuredWidth, bitmapRootLayout.measuredHeight)
        // 经过 measure 和 layout,待转换的布局已经知道自己多大,也知道自己的子 view 都在哪个位置了
        // 接下来就是开始绘制了
        // 首先准备一个 Bitmap,大小等于待转换布局的大小
        val bitmap = Bitmap.createBitmap(bitmapRootLayout.measuredWidth, bitmapRootLayout.measuredHeight, Bitmap.Config.RGB_565)
        // 然后准备一个画布,并且将背景颜色设置为白色。不这么做的话得到的就是透明的图片
        val canvas = Canvas(bitmap)
        canvas.drawColor(Color.WHITE)
        // 把布局绘制到画布上
        bitmapRootLayout.draw(canvas)

        // 最后展示一下
        previewImageView.setImageBitmap(bitmap)
    }
}
代码中已经有非常详细的注解了,这里就不再赘述。具体的效果如下:
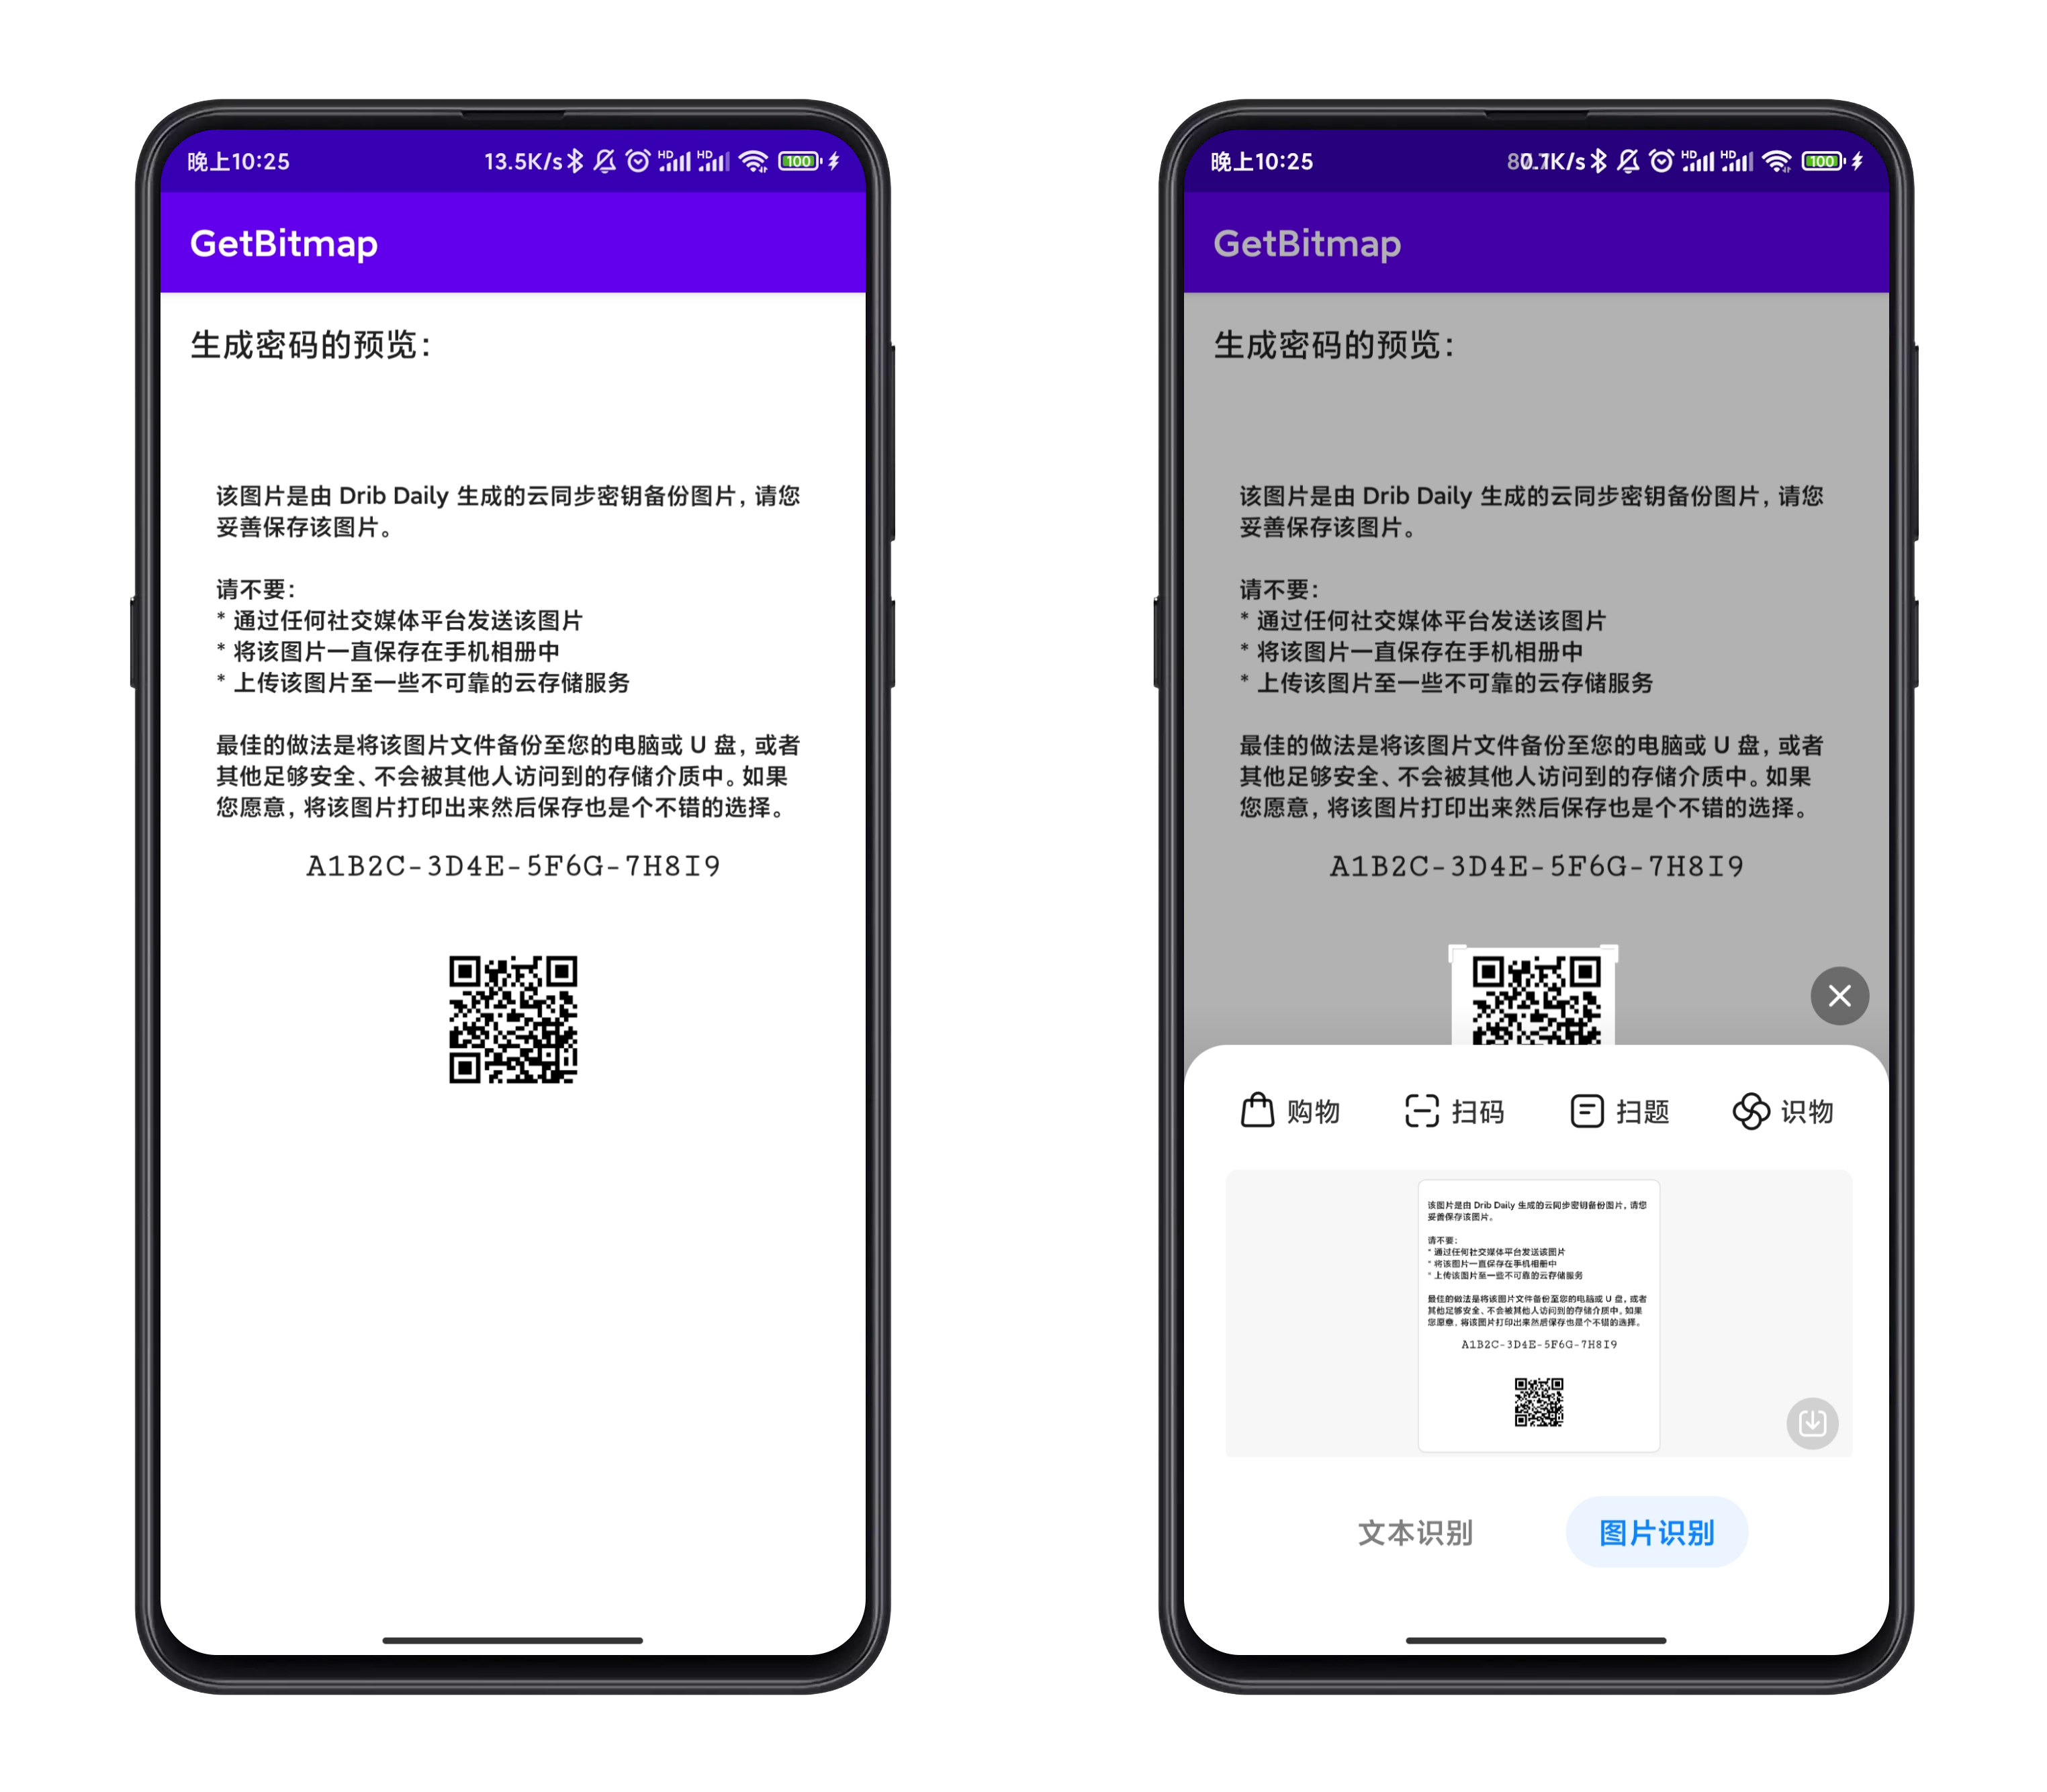
可以看到是能够正常生成图片的。当然了,上述代码只是一个非常简单的 Demo,如果真的要用到项目里的话,还需要再修改修改。
0x04 实现的原理
如果只是介绍一下怎么用,那未免也太简单了(其实主要是因为这篇文章太短了,我想凑个字数)。所以这里我还是接着写一下我对于这段代码的理解。当然也未必正确,如果有错误的地方还请在评论里指正。
整个 Demo 看来,其实真正关键的代码就是下面这些:
bitmapRootLayout.measure(View.MeasureSpec.makeMeasureSpec(resources.displayMetrics.widthPixels, View.MeasureSpec.EXACTLY),
        View.MeasureSpec.makeMeasureSpec(0, View.MeasureSpec.UNSPECIFIED))
bitmapRootLayout.layout(0, 0, bitmapRootLayout.measuredWidth, bitmapRootLayout.measuredHeight)
// 经过 measure 和 layout,待转换的布局已经知道自己多大,也知道自己的子 view 都在哪个位置了
// 接下来就是开始绘制了
// 首先准备一个 Bitmap,大小等于待转换布局的大小
val bitmap = Bitmap.createBitmap(bitmapRootLayout.measuredWidth, bitmapRootLayout.measuredHeight, Bitmap.Config.RGB_565)
// 然后准备一个画布,并且将背景颜色设置为白色。不这么做的话得到的就是透明的图片
val canvas = Canvas(bitmap)
canvas.drawColor(Color.WHITE)
// 把布局绘制到画布上
bitmapRootLayout.draw(canvas)
接下来我将逐一介绍这些代码的意义以及原理。
1)View.measure()
首先第一行是调用了 View 的 measure() 方法。顾名思义,就是去测量大小用的。它需要传入两个参数,分别是 widthMeasureSpec 和 heightMeasureSpec。这两个值类型都是 Int,分别用于确定视图的宽度和高度的规格和大小。
这里传入的两个参数值分别是:
View.MeasureSpec.makeMeasureSpec(resources.displayMetrics.widthPixels, View.MeasureSpec.EXACTLY)View.MeasureSpec.makeMeasureSpec(0, View.MeasureSpec.UNSPECIFIED)
可以看见,其实两者都是去调用了 View.MeasureSpec.makeMeasureSpec() 这个方法。这个方法的作用就是去构建一个 MeasureSpec,这个对象就是用来描述 View 宽度或者高度的规格及大小的。
那么,什么叫「规格及大小」呢?
MeasureSpec
来看一个非常熟悉的例子吧:
<TextView
    android:layout_width="match_parent"
    android:layout_height="wrap_content"
    ... />
这段代码定义了一个 TextView,并且声明了它的宽度是 match_parent,也就是和它的父 View 等宽;它的高度是 wrap_content,也就是根据 TextView 的内容来调整它的高度。
对于开发者来说,这样的写法是够方便了,但是系统需要根据这样的配置代码来实际测量出它的大小的。比如说这个 TextView 设置了宽度为 match_parent,那系统就得去找它的父 View,看看父 View 的宽度是多大。再比如设置了高度为 wrap_content,那就得去实际量一下看看这个 TextView 到底是有多高。
再来看一个例子:
<androidx.constraintlayout.widget.ConstraintLayout
    ...>

    <TextView
        android:layout_width="0dp"
        android:layout_height="100dp"
        ...
        app:layout_constraintStart_toStartOf="parent"
        app:layout_constraintEnd_toEndOf="parent" />

</androidx.constraintlayout.widget.ConstraintLayout>
你看,现在要想测量一个 View 的具体大小就更难了,因为 View 的大小还受到其他 View 的约束。同时,还出现了指定具体 dp 的方式,而且指定具体 dp 的方式还有可能会被约束关系所覆盖。这样一来,系统要想记录某个 View 到底有多大就变得比较麻烦了。
而 MeasureSpec 就是专门负责记录 View 的这些配置的。系统通过 MeasureSpec 来传输和记录一个 View 的宽高测量模式以及大小。它由两部分组成,分别是 SpecMode 和 SpecSize,记录着测量模式和大小。
其中,SpecMode模式共分为三类:
EXACTLY:对应LayoutParams中的match_parent和具体数值这两种模式。检测到View所需要的精确大小,这时候View的最终大小就是SpecSize所指定的值,AT_MOST:对应LayoutParams中的wrap_content。View 的大小不能大于父容器的大小。UNSPECIFIED:不对 View 进行任何限制,要多大给多大,一般用于系统内部,如ListView,ScrollView
所以现在再回过头来看一下当初是怎么设置的:
bitmapRootLayout.measure(View.MeasureSpec.makeMeasureSpec(resources.displayMetrics.widthPixels, View.MeasureSpec.EXACTLY),
        View.MeasureSpec.makeMeasureSpec(0, View.MeasureSpec.UNSPECIFIED))
这样看来就很明白了。首先通过 resources.displayMetrics.widthPixels 获取到屏幕的宽度,然后将 SpecMode 设置为 EXACTLY,这样 bitmapRootLayout 的宽度就变成了和屏幕等宽。而高度的 SpecSize 和 SpecMode 分别是 0 和 UNSPECIFIED,也就是不限制 bitmapRootLayout 的高度,那么生成的图片的高度也就是由其布局中的内容决定了。
measure 的大致流程
measure() 方法的源码如下:
/**
 * <p>
 * This is called to find out how big a view should be. The parent
 * supplies constraint information in the width and height parameters.
 * </p>
 *
 * <p>
 * The actual measurement work of a view is performed in
 * {@link #onMeasure(int, int)}, called by this method. Therefore, only
 * {@link #onMeasure(int, int)} can and must be overridden by subclasses.
 * </p>
 *
 *
 * @param widthMeasureSpec Horizontal space requirements as imposed by the
 *        parent
 * @param heightMeasureSpec Vertical space requirements as imposed by the
 *        parent
 *
 * @see #onMeasure(int, int)
 */
public final void measure(int widthMeasureSpec, int heightMeasureSpec) {
    boolean optical = isLayoutModeOptical(this);
    if (optical != isLayoutModeOptical(mParent)) {
        Insets insets = getOpticalInsets();
        int oWidth  = insets.left + insets.right;
        int oHeight = insets.top  + insets.bottom;
        widthMeasureSpec  = MeasureSpec.adjust(widthMeasureSpec,  optical ? -oWidth  : oWidth);
        heightMeasureSpec = MeasureSpec.adjust(heightMeasureSpec, optical ? -oHeight : oHeight);
    }

    // Suppress sign extension for the low bytes
    long key = (long) widthMeasureSpec << 32 | (long) heightMeasureSpec & 0xffffffffL;
    if (mMeasureCache == null) mMeasureCache = new LongSparseLongArray(2);

    final boolean forceLayout = (mPrivateFlags & PFLAG_FORCE_LAYOUT) == PFLAG_FORCE_LAYOUT;

    // Optimize layout by avoiding an extra EXACTLY pass when the view is
    // already measured as the correct size. In API 23 and below, this
    // extra pass is required to make LinearLayout re-distribute weight.
    final boolean specChanged = widthMeasureSpec != mOldWidthMeasureSpec
            || heightMeasureSpec != mOldHeightMeasureSpec;
    final boolean isSpecExactly = MeasureSpec.getMode(widthMeasureSpec) == MeasureSpec.EXACTLY
            && MeasureSpec.getMode(heightMeasureSpec) == MeasureSpec.EXACTLY;
    final boolean matchesSpecSize = getMeasuredWidth() == MeasureSpec.getSize(widthMeasureSpec)
            && getMeasuredHeight() == MeasureSpec.getSize(heightMeasureSpec);
    final boolean needsLayout = specChanged
            && (sAlwaysRemeasureExactly || !isSpecExactly || !matchesSpecSize);

    if (forceLayout || needsLayout) {
        // first clears the measured dimension flag
        mPrivateFlags &= ~PFLAG_MEASURED_DIMENSION_SET;

        resolveRtlPropertiesIfNeeded();

        int cacheIndex = forceLayout ? -1 : mMeasureCache.indexOfKey(key);
        if (cacheIndex < 0 || sIgnoreMeasureCache) {
            // measure ourselves, this should set the measured dimension flag back
            onMeasure(widthMeasureSpec, heightMeasureSpec);
            mPrivateFlags3 &= ~PFLAG3_MEASURE_NEEDED_BEFORE_LAYOUT;
        } else {
            long value = mMeasureCache.valueAt(cacheIndex);
            // Casting a long to int drops the high 32 bits, no mask needed
            setMeasuredDimensionRaw((int) (value >> 32), (int) value);
            mPrivateFlags3 |= PFLAG3_MEASURE_NEEDED_BEFORE_LAYOUT;
        }

        // flag not set, setMeasuredDimension() was not invoked, we raise
        // an exception to warn the developer
        if ((mPrivateFlags & PFLAG_MEASURED_DIMENSION_SET) != PFLAG_MEASURED_DIMENSION_SET) {
            throw new IllegalStateException("View with id " + getId() + ": "
                    + getClass().getName() + "#onMeasure() did not set the"
                    + " measured dimension by calling"
                    + " setMeasuredDimension()");
        }

        mPrivateFlags |= PFLAG_LAYOUT_REQUIRED;
    }

    mOldWidthMeasureSpec = widthMeasureSpec;
    mOldHeightMeasureSpec = heightMeasureSpec;

    mMeasureCache.put(key, ((long) mMeasuredWidth) << 32 |
            (long) mMeasuredHeight & 0xffffffffL); // suppress sign extension
}
这段代码有点长,一段段来分析。
首先看这一段:
boolean optical = isLayoutModeOptical(this);
if (optical != isLayoutModeOptical(mParent)) {
    Insets insets = getOpticalInsets();
    int oWidth  = insets.left + insets.right;
    int oHeight = insets.top  + insets.bottom;
    widthMeasureSpec  = MeasureSpec.adjust(widthMeasureSpec,  optical ? -oWidth  : oWidth);
    heightMeasureSpec = MeasureSpec.adjust(heightMeasureSpec, optical ? -oHeight : oHeight);
}
这一段是用来判断是否存在特殊光学边界的,例如光晕、阴影等。如果有,就需要调整一下大小。
后面一大段是变量的声明与判断,不用关心。关键是下面这段:
if (cacheIndex < 0 || sIgnoreMeasureCache) {
    // measure ourselves, this should set the measured dimension flag back
    onMeasure(widthMeasureSpec, heightMeasureSpec);
    mPrivateFlags3 &= ~PFLAG3_MEASURE_NEEDED_BEFORE_LAYOUT;
} else {
    long value = mMeasureCache.valueAt(cacheIndex);
    // Casting a long to int drops the high 32 bits, no mask needed
    setMeasuredDimensionRaw((int) (value >> 32), (int) value);
    mPrivateFlags3 |= PFLAG3_MEASURE_NEEDED_BEFORE_LAYOUT;
}
这里就是根据测量结果缓存来判断一下,如果需要重新测量,就调用 onMeasure();如果不需要测量,直接使用缓存,就使用 setMeasuredDimensionRaw()。
onMeasure() 方法在 View 中的实现非常简单:
protected void onMeasure(int widthMeasureSpec, int heightMeasureSpec) {
    setMeasuredDimension(getDefaultSize(getSuggestedMinimumWidth(), widthMeasureSpec),
            getDefaultSize(getSuggestedMinimumHeight(), heightMeasureSpec));
}
看到这里调用了三个方法,分别是 setMeasuredDimension()、getDefaultSize() 和 getSuggestedMinimumWidth() / getSuggestedMinimumHeight()。
来看看 setMeasuredDimension() 方法:
/**
 * <p>This method must be called by {@link #onMeasure(int, int)} to store the
 * measured width and measured height. Failing to do so will trigger an
 * exception at measurement time.</p>
 *
 * @param measuredWidth The measured width of this view.  May be a complex
 * bit mask as defined by {@link #MEASURED_SIZE_MASK} and
 * {@link #MEASURED_STATE_TOO_SMALL}.
 * @param measuredHeight The measured height of this view.  May be a complex
 * bit mask as defined by {@link #MEASURED_SIZE_MASK} and
 * {@link #MEASURED_STATE_TOO_SMALL}.
 */
protected final void setMeasuredDimension(int measuredWidth, int measuredHeight) {
    boolean optical = isLayoutModeOptical(this);
    if (optical != isLayoutModeOptical(mParent)) {
        Insets insets = getOpticalInsets();
        int opticalWidth  = insets.left + insets.right;
        int opticalHeight = insets.top  + insets.bottom;

        measuredWidth  += optical ? opticalWidth  : -opticalWidth;
        measuredHeight += optical ? opticalHeight : -opticalHeight;
    }
    setMeasuredDimensionRaw(measuredWidth, measuredHeight);
}
可见它最后其实还是去调用了 setMeasuredDimensionRaw() 方法。而 setMeasuredDimensionRaw() 的作用也很简单,就是设置一下值而已:
/**
 * Sets the measured dimension without extra processing for things like optical bounds.
 * Useful for reapplying consistent values that have already been cooked with adjustments
 * for optical bounds, etc. such as those from the measurement cache.
 *
 * @param measuredWidth The measured width of this view.  May be a complex
 * bit mask as defined by {@link #MEASURED_SIZE_MASK} and
 * {@link #MEASURED_STATE_TOO_SMALL}.
 * @param measuredHeight The measured height of this view.  May be a complex
 * bit mask as defined by {@link #MEASURED_SIZE_MASK} and
 * {@link #MEASURED_STATE_TOO_SMALL}.
 */
private void setMeasuredDimensionRaw(int measuredWidth, int measuredHeight) {
    mMeasuredWidth = measuredWidth;
    mMeasuredHeight = measuredHeight;

    mPrivateFlags |= PFLAG_MEASURED_DIMENSION_SET;
}
然后再来看一下 getDefaultSize() 方法的源码:
/**
 * Utility to return a default size. Uses the supplied size if the
 * MeasureSpec imposed no constraints. Will get larger if allowed
 * by the MeasureSpec.
 *
 * @param size Default size for this view
 * @param measureSpec Constraints imposed by the parent
 * @return The size this view should be.
 */
public static int getDefaultSize(int size, int measureSpec) {
    int result = size;
    int specMode = MeasureSpec.getMode(measureSpec);
    int specSize = MeasureSpec.getSize(measureSpec);

    switch (specMode) {
    case MeasureSpec.UNSPECIFIED:
        result = size;
        break;
    case MeasureSpec.AT_MOST:
    case MeasureSpec.EXACTLY:
        result = specSize;
        break;
    }
    return result;
}
这个方法的主要作用就是来根据 MeasureSpec 中 SpecMode 来返回 View 的默认大小(注意,是默认大小,不是真实大小)。对于 UNSPECIFIED 来说,返回的是 size;而对于 AT_MOST 和 EXACTLY 来说,返回的则是 specSize。在这里,size 代表的是当前 View 的默认大小,而 specSize 代表的是父布局限制的大小。
前面已经说了,不同 SpecMode 有着不同的效果。UNSPECIFIED 表示不对 View 进行任何限制,那么自然返回的就是 size 了——毕竟已经说了不对 View 进行任何限制了,那自然就不用管父布局限制的大小 specSize 了。而对于 AT_MOST 和 EXACTLY 来说,都要受到父布局的限制,所以返回的就是 specSize。
最后来看看 onMeasure() 中调用的第三个函数 getSuggestedMinimumWidth() 和 getSuggestedMinimumHeight(),getSuggestedMinimumWidth() 该方法返回的是所建议的 view 应该使用的最小宽度——在 view 的最小宽度和背景的最小宽度中取最大的返回值。另一个 getSuggestedMinimumHeight() 也是类似的,不再详细说了,毕竟源码也只有一行而已。
或许会觉得奇怪,这个 onMeasure() 方法为什么这么简单呢?这么简单的代码就能测量出界面上的元素大小了?感觉似乎没有什么测量的代码,只是在不停地调用函数以及设置值呢。
其实稍微想一下就知道了,View 中的这个onMeasure() 并不是要把所有布局的测量逻辑都写进来,不同 View 和 ViewGroup 有着不同的 Measure 方式,自然也得在这些 View 和 ViewGroup 定义的时候重写 onMeasure() 方法了。
比如说 LinearLayout 重写的 onMeasure() 方法:
@Override
protected void onMeasure(int widthMeasureSpec, int heightMeasureSpec) {
    if (mOrientation == VERTICAL) {
        measureVertical(widthMeasureSpec, heightMeasureSpec);
    } else {
        measureHorizontal(widthMeasureSpec, heightMeasureSpec);
    }
}
其中 measureVertical() 和 measureHorizontal() 才是真正测量其大小的逻辑,包括循环测量每个子 View 的大小。每个函数的代码都有几百行,我就不贴出来了。
顺便一提,其实 View 中的 onMeasure() 代码很简单,是因为大多数时候是去调用各个 View 重写的 onMeasure() 方法,而非 View 类的 onMeasure() 的方法。这么说有点拗口,我写个例子你就知道怎么一回事了:
public class Main {
    public static void main(String[] args){
        LinearLayout layout = new LinearLayout();
        layout.measure();
    }
}

class View {
    public void measure() {
        System.out.println("View.measure()");
        onMeasure();
    }

    public void onMeasure() {
        System.out.println("View.onMeasure()");
    }
}

class LinearLayout extends View {
    @Override
    public void onMeasure() {
        System.out.println("LinearLayout.onMeasure()");
    }
}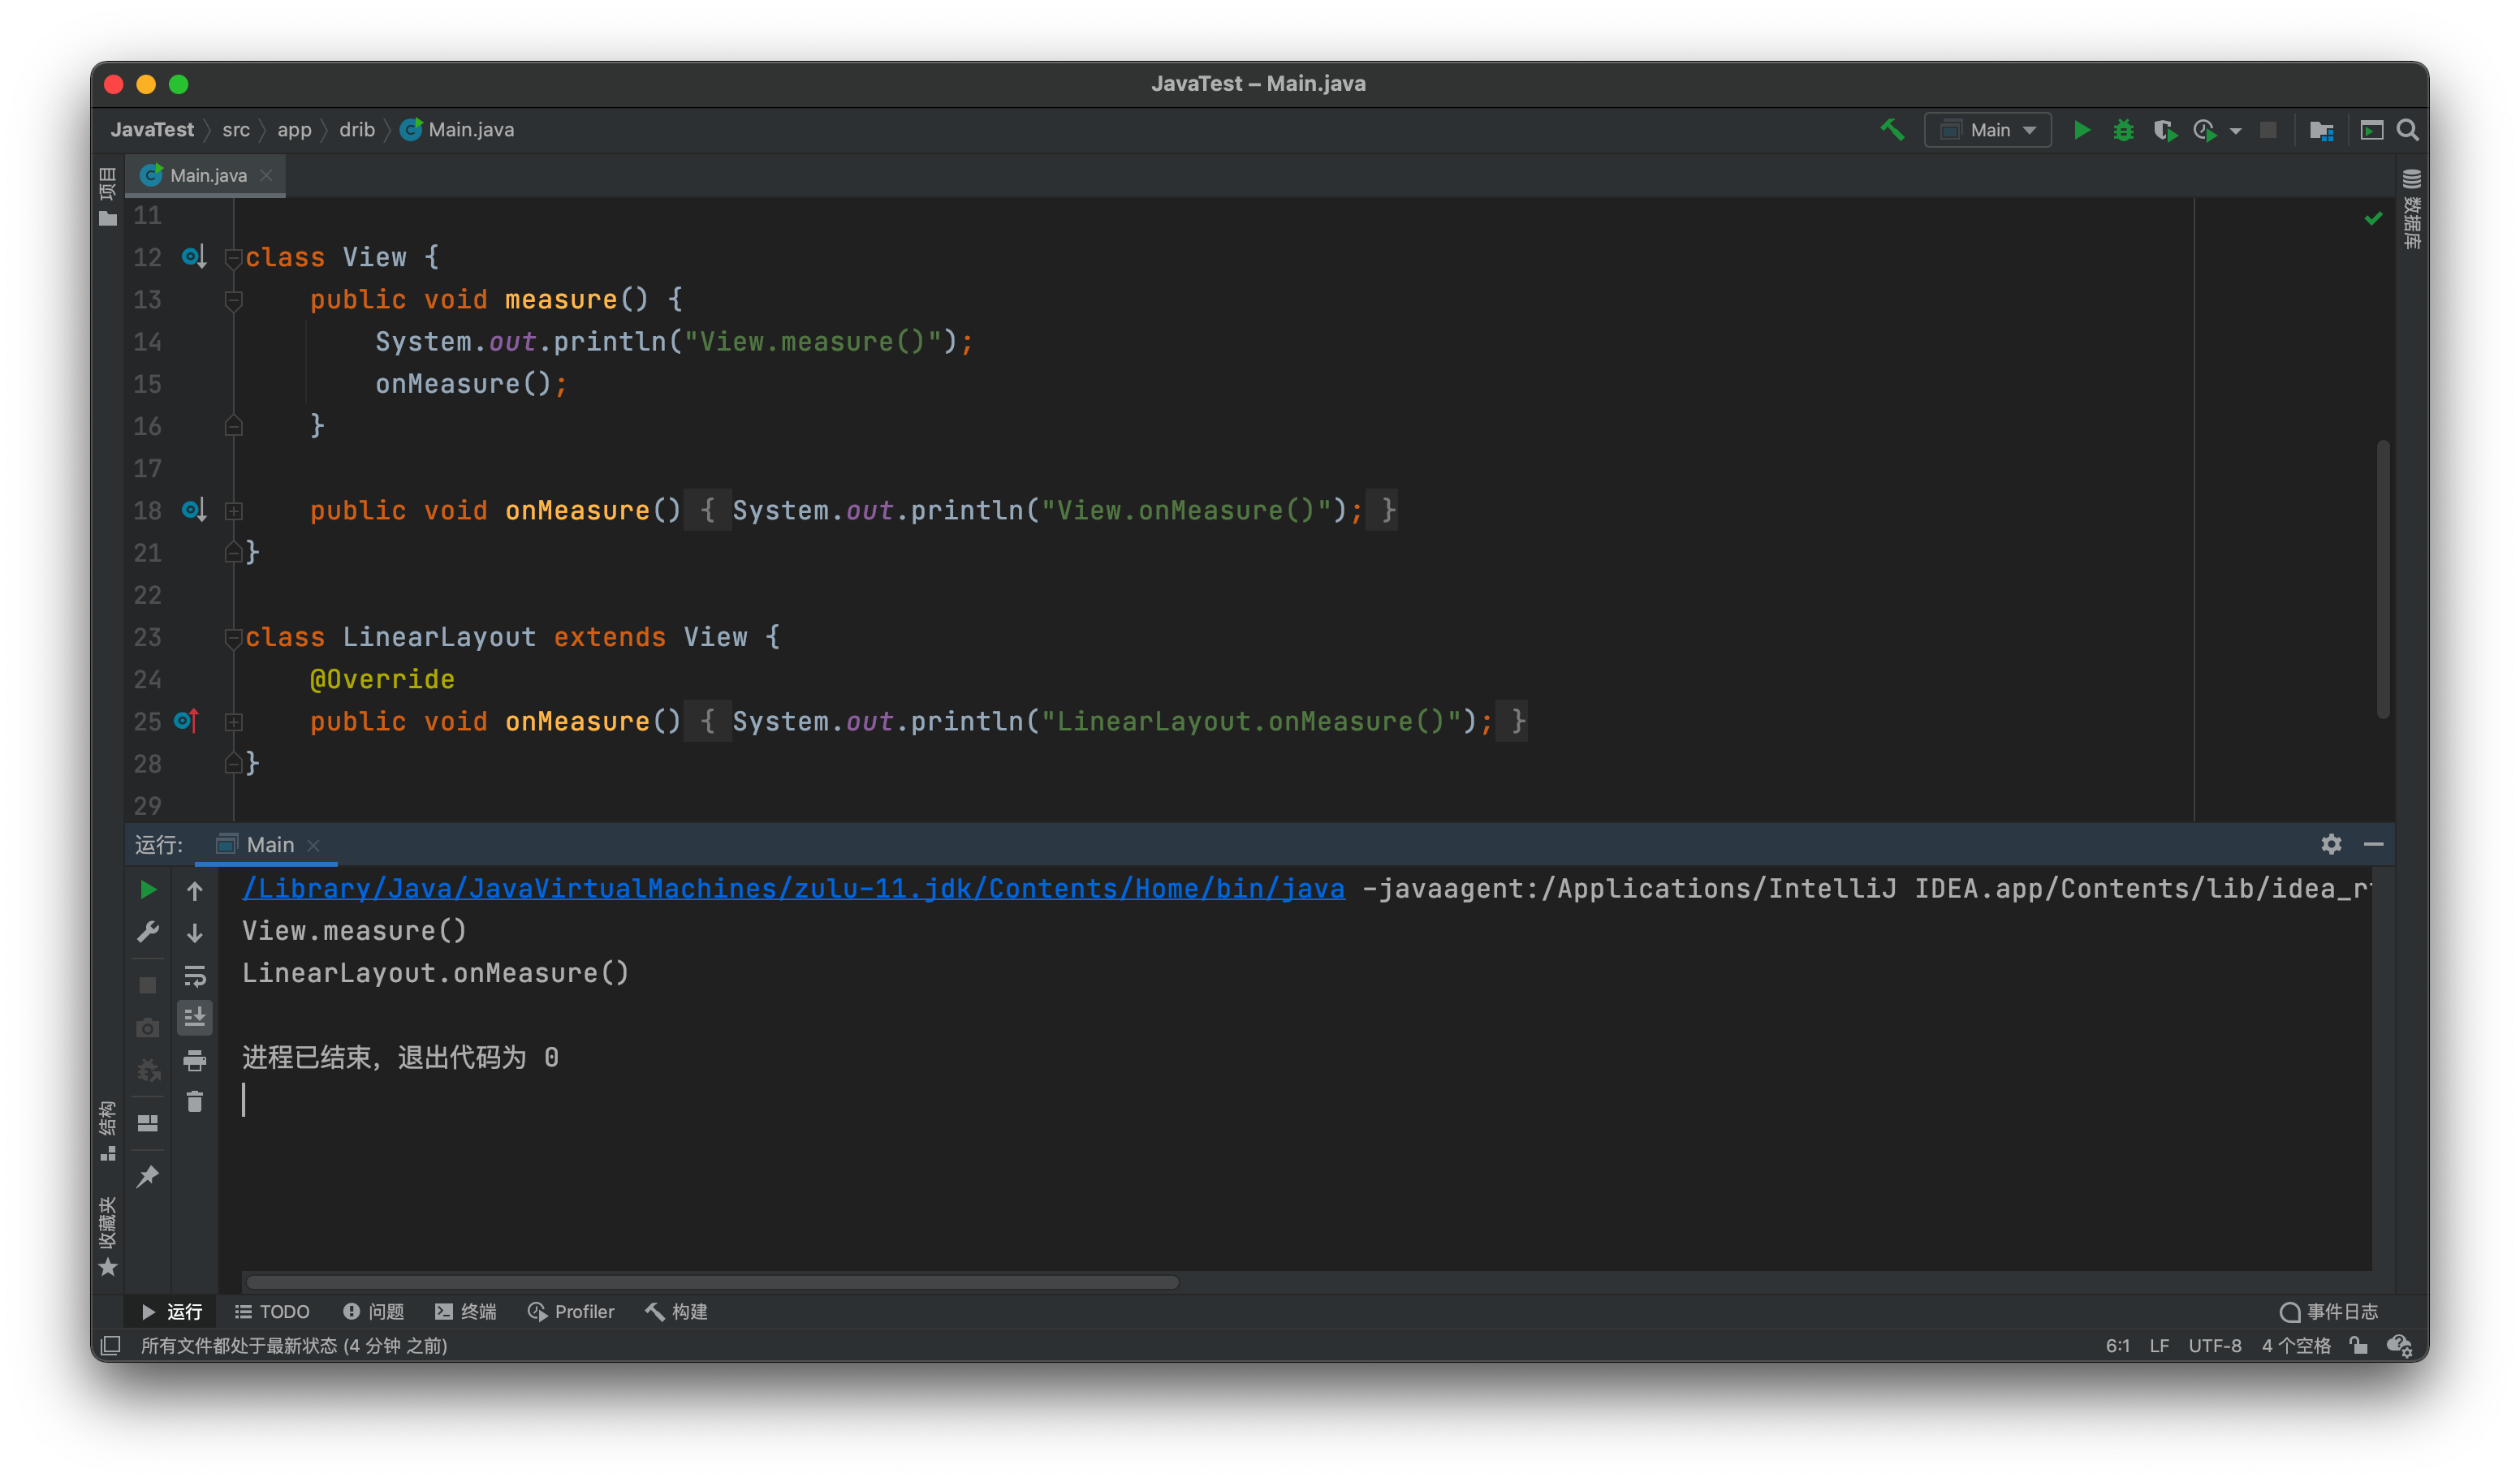
你看,根本就不会去调用 View 类的 onMeasure(),而是去调用 LinearLayout 的 onMeasure() 了。
小结该方法的作用
上面讲了一大堆关于源码的内容,现在回过头来看看 Demo 里面是怎么用到 measure() 这个方法的:
bitmapRootLayout.measure(View.MeasureSpec.makeMeasureSpec(resources.displayMetrics.widthPixels, View.MeasureSpec.EXACTLY),
        View.MeasureSpec.makeMeasureSpec(0, View.MeasureSpec.UNSPECIFIED))
现在应该明白了,通过调用 bitmapRootLayout 的 measure() 方法,是怎么实现测量 bitmapRootLayout 的真实大小的吧。首先设置了一下 MeasureSpec,将宽度设为和屏幕等宽,高度不限制,然后传入 measure() 方法。
measure() 方法拿到 MeasureSpec 以后,由于没有缓存,所以调用 onMeasure() 方法,并且这里调用的其实是 bitmapRootLayout 的 onMeasure() 方法,从而测量 bitmapRootLayout 真实的大小。
2)View.layout()
measure() 的用途是测量 View 的大小,而 layout() 则是定位 View 的位置。它接收四个参数,分别代表着左、上、右、下的坐标,当然这个坐标是相对于当前视图的父视图而言的。
还是来看看它的源代码吧:
/**
 * Assign a size and position to a view and all of its
 * descendants
 *
 * <p>This is the second phase of the layout mechanism.
 * (The first is measuring). In this phase, each parent calls
 * layout on all of its children to position them.
 * This is typically done using the child measurements
 * that were stored in the measure pass().</p>
 *
 * <p>Derived classes should not override this method.
 * Derived classes with children should override
 * onLayout. In that method, they should
 * call layout on each of their children.</p>
 *
 * @param l Left position, relative to parent
 * @param t Top position, relative to parent
 * @param r Right position, relative to parent
 * @param b Bottom position, relative to parent
 */
@SuppressWarnings({"unchecked"})
public void layout(int l, int t, int r, int b) {
    if ((mPrivateFlags3 & PFLAG3_MEASURE_NEEDED_BEFORE_LAYOUT) != 0) {
        onMeasure(mOldWidthMeasureSpec, mOldHeightMeasureSpec);
        mPrivateFlags3 &= ~PFLAG3_MEASURE_NEEDED_BEFORE_LAYOUT;
    }

    int oldL = mLeft;
    int oldT = mTop;
    int oldB = mBottom;
    int oldR = mRight;

    boolean changed = isLayoutModeOptical(mParent) ?
            setOpticalFrame(l, t, r, b) : setFrame(l, t, r, b);

    if (changed || (mPrivateFlags & PFLAG_LAYOUT_REQUIRED) == PFLAG_LAYOUT_REQUIRED) {
        onLayout(changed, l, t, r, b);

        if (shouldDrawRoundScrollbar()) {
            if(mRoundScrollbarRenderer == null) {
                mRoundScrollbarRenderer = new RoundScrollbarRenderer(this);
            }
        } else {
            mRoundScrollbarRenderer = null;
        }

        mPrivateFlags &= ~PFLAG_LAYOUT_REQUIRED;

        ListenerInfo li = mListenerInfo;
        if (li != null && li.mOnLayoutChangeListeners != null) {
            ArrayList<OnLayoutChangeListener> listenersCopy =
                    (ArrayList<OnLayoutChangeListener>)li.mOnLayoutChangeListeners.clone();
            int numListeners = listenersCopy.size();
            for (int i = 0; i < numListeners; ++i) {
                listenersCopy.get(i).onLayoutChange(this, l, t, r, b, oldL, oldT, oldR, oldB);
            }
        }
    }

    final boolean wasLayoutValid = isLayoutValid();

    mPrivateFlags &= ~PFLAG_FORCE_LAYOUT;
    mPrivateFlags3 |= PFLAG3_IS_LAID_OUT;

    if (!wasLayoutValid && isFocused()) {
        mPrivateFlags &= ~PFLAG_WANTS_FOCUS;
        if (canTakeFocus()) {
            // We have a robust focus, so parents should no longer be wanting focus.
            clearParentsWantFocus();
        } else if (getViewRootImpl() == null || !getViewRootImpl().isInLayout()) {
            // This is a weird case. Most-likely the user, rather than ViewRootImpl, called
            // layout. In this case, there's no guarantee that parent layouts will be evaluated
            // and thus the safest action is to clear focus here.
            clearFocusInternal(null, /* propagate */ true, /* refocus */ false);
            clearParentsWantFocus();
        } else if (!hasParentWantsFocus()) {
            // original requestFocus was likely on this view directly, so just clear focus
            clearFocusInternal(null, /* propagate */ true, /* refocus */ false);
        }
        // otherwise, we let parents handle re-assigning focus during their layout passes.
    } else if ((mPrivateFlags & PFLAG_WANTS_FOCUS) != 0) {
        mPrivateFlags &= ~PFLAG_WANTS_FOCUS;
        View focused = findFocus();
        if (focused != null) {
            // Try to restore focus as close as possible to our starting focus.
            if (!restoreDefaultFocus() && !hasParentWantsFocus()) {
                // Give up and clear focus once we've reached the top-most parent which wants
                // focus.
                focused.clearFocusInternal(null, /* propagate */ true, /* refocus */ false);
            }
        }
    }

    if ((mPrivateFlags3 & PFLAG3_NOTIFY_AUTOFILL_ENTER_ON_LAYOUT) != 0) {
        mPrivateFlags3 &= ~PFLAG3_NOTIFY_AUTOFILL_ENTER_ON_LAYOUT;
        notifyEnterOrExitForAutoFillIfNeeded(true);
    }

    notifyAppearedOrDisappearedForContentCaptureIfNeeded(true);
}
这个代码还是很长,但仔细观察一下就会发现一个关键函数:
onLayout(changed, l, t, r, b);然后再去看看 onLayout() 的源码:
/**
 * Called from layout when this view should
 * assign a size and position to each of its children.
 *
 * Derived classes with children should override
 * this method and call layout on each of
 * their children.
 * @param changed This is a new size or position for this view
 * @param left Left position, relative to parent
 * @param top Top position, relative to parent
 * @param right Right position, relative to parent
 * @param bottom Bottom position, relative to parent
 */
protected void onLayout(boolean changed, int left, int top, int right, int bottom) {
}很明显,onLayout() 就是专门用来重写的。而且有很多 View 根本不会重写这个方法,因为它们内部不需要定位。比方说 ProgressBar 就没有重写 onLayout(),因为 ProgressBar 里面没有其他东西了,也不需要定位,自然也就不需要重写 onLayout()。
不过另一个常用的控件 TextView 是重写了 onLayout() 的:
@Override
protected void onLayout(boolean changed, int left, int top, int right, int bottom) {
    super.onLayout(changed, left, top, right, bottom);
    if (mDeferScroll >= 0) {
        int curs = mDeferScroll;
        mDeferScroll = -1;
        bringPointIntoView(Math.min(curs, mText.length()));
    }
    // Call auto-size after the width and height have been calculated.
    autoSizeText();
}
另外还有各种布局,比如 LinearLayout、FrameLayout,这些肯定也都重写了 onLayout() 的。
3)Canvas(bitmap)
Canvas 是 Android 中用于绘制的类。它有两种构造方法,一种是不带参数的,另一种是带参数的:
Canvas canvas = new Canvas();
Canvas canvas = new Canvas(bitmap);
传入的 bitmap 参数表示用这个指定的 Bitmap 来构建画布。来看看这个构造方法:
/**
 * Construct a canvas with the specified bitmap to draw into. The bitmap
 * must be mutable.
 *
 * <p>The initial target density of the canvas is the same as the given
 * bitmap's density.
 *
 * @param bitmap Specifies a mutable bitmap for the canvas to draw into.
 */
public Canvas(@NonNull Bitmap bitmap) {
    if (!bitmap.isMutable()) {
        throw new IllegalStateException("Immutable bitmap passed to Canvas constructor");
    }
    throwIfCannotDraw(bitmap);
    mNativeCanvasWrapper = nInitRaster(bitmap.getNativeInstance());
    mFinalizer = NoImagePreloadHolder.sRegistry.registerNativeAllocation(
                this, mNativeCanvasWrapper);
    mBitmap = bitmap;
    mDensity = bitmap.mDensity;
}
构造方法很简短,感觉就是 nInitRaster() 用到了一下,然后设置了一下 Canvas 类中的成员变量而已。但是如果你去搜 mBitmap,会发现其实没有什么地方用到了 mBitmap。然后搜 nInitRaster(),又会发现这是一个 native 方法:
@FastNative
private static native long nInitRaster(long bitmapHandle);
所以这一步的分析只好到此为止了。反正明白这里是传入了一个 Bitmap,让后续的绘制都绘制在这个 Bitmap 上即可。
4)View.draw(canvas)
终于来到了最后一步——绘制。这里调用了 View 的 draw() 方法,并且传入了一个 Canvas 参数。这个 Canvas 在之前的代码中已经指定了 Bitmap,所以现在的效果就是告诉 View 把绘制结果绘制在这个 Bitmap 上。
来看看 draw() 的源码吧:
/**
 * Manually render this view (and all of its children) to the given Canvas.
 * The view must have already done a full layout before this function is
 * called.  When implementing a view, implement
 * {@link #onDraw(android.graphics.Canvas)} instead of overriding this method.
 * If you do need to override this method, call the superclass version.
 *
 * @param canvas The Canvas to which the View is rendered.
 */
@CallSuper
public void draw(Canvas canvas) {
    final int privateFlags = mPrivateFlags;
    mPrivateFlags = (privateFlags & ~PFLAG_DIRTY_MASK) | PFLAG_DRAWN;

    // Step 1, draw the background, if needed
    int saveCount;

    drawBackground(canvas);

    // skip step 2 & 5 if possible (common case)
    final int viewFlags = mViewFlags;
    boolean horizontalEdges = (viewFlags & FADING_EDGE_HORIZONTAL) != 0;
    boolean verticalEdges = (viewFlags & FADING_EDGE_VERTICAL) != 0;
    if (!verticalEdges && !horizontalEdges) {
        // Step 3, draw the content
        onDraw(canvas);

        // Step 4, draw the children
        dispatchDraw(canvas);

        drawAutofilledHighlight(canvas);

        // Overlay is part of the content and draws beneath Foreground
        if (mOverlay != null && !mOverlay.isEmpty()) {
            mOverlay.getOverlayView().dispatchDraw(canvas);
        }

        // Step 6, draw decorations (foreground, scrollbars)
        onDrawForeground(canvas);

        // Step 7, draw the default focus highlight
        drawDefaultFocusHighlight(canvas);

        if (isShowingLayoutBounds()) {
            debugDrawFocus(canvas);
        }

        // we're done...
        return;
    }

    /*
     * Here we do the full fledged routine...
     * (this is an uncommon case where speed matters less,
     * this is why we repeat some of the tests that have been
     * done above)
     */

    // ...

    // Step 2, save the canvas' layers
    // ...

    // Step 3, draw the content
    onDraw(canvas);

    // Step 4, draw the children
    dispatchDraw(canvas);

    // Step 5, draw the fade effect and restore layers
    // ...

    // Step 6, draw decorations (foreground, scrollbars)
    onDrawForeground(canvas);

    // Step 7, draw the default focus highlight
    drawDefaultFocusHighlight(canvas);

    if (isShowingLayoutBounds()) {
        debugDrawFocus(canvas);
    }
}
源代码真的太长了,所以我这里贴上来的是简化版的源码,一些不太重要的我就用 // ... 来代替了。
可以看到,Google 其实有仔细注释一下这么长的代码中每一步都在干什么。我简单翻译过来就是这样的:
- 绘制背景
- 如果有必要,保存画布的图层以准备 fading
- 绘制 View 的内容
- 绘制子 View
- 如果有必要,绘制 fading 边缘和恢复画布图层
- 绘制滚动条
- 如果有必要,绘制焦点高亮
第二步和第五步主要是 Fading Edge 相关的,用到的稍微少一些。而另外几步也都是调用各个函数来实现的:
- 第 1 步:绘制背景(
drawBackground(canvas)) - 第 3 步:绘制 View 的内容(
onDraw(canvas)) - 第 4 步:绘制子 View(
dispatchDraw(canvas)) - 第 6 步:绘制滚动条(
onDrawForeground(canvas)) - 第 7 步:绘制焦点高亮(
drawDefaultFocusHighlight(canvas))
其中 onDraw() 和 dispatchDraw() 都是空方法,都是交给子类去实现的。但也因为关键就是这两个方法,所以这一步也没太多好分析的,如果要分析的话,就得去看各个控件中的相关代码,这就超出本文的范围了(其实是因为我也没去看。对,我就是这么懒)。
0xFF 写在最后
没什么要说的了。累了。告辞。